The title was 'Time to Play' and very much sums up my approach to the abstract creative images I create. I take 'An image' develop it in Lightroom and then open it in Photoshop. My Lightroom image sometimes, as is this time', be more than one Lightroom creation by using virtual copies. I would take these variations into photoshop as layers. Using the layer blend modes, plus flipping and transforming the layers to create a pleasing image (to me). I am often draw to very regimented designs and will look to increase symmetry through my playing.
As I go along I will save different versions through the process to document how I got somewhere. These versions do not normally see the light of day but I thought I would create a blog about todays efforts.
So to start here is the final final triptych and the words that accompanied the image on BlipFoto and Facebook.
The 'Blip' was entitled 'Time to Play'
 |
| Time to Play |
Whilst I was out this morning on a walk back from the village shop I stopped for a while on the village green.
I had my camera with me, of course, plus a variable neutral density filter. I decided to have a play with Intensional Camera Movement (ICM) combined with In-Camera Multiple Exposure (ME).
I have not really explored the potential of ME with the Fuji X100V. Using the Fuji with its fixed 23mm lens (35mm full frame focal length equivalent) is a different experience to when I do this with the Canon cameras where I normally use 100mm - 200mm zoom.
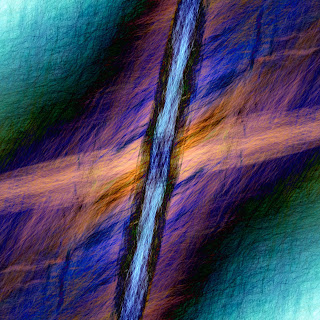
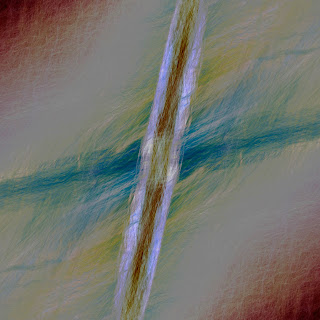
I spent a while around the playpark and then as I was walking across the field I noticed the games pitches had been recently painted. I started playing with these lines using ICM + ME.
Back home I downloaded the files and was going to just choose one for my daily photo journal blip.
I got a bit carried away. I had chosen one image I liked and created three different versions in lightroom using virtual copies. Opened them in Photoshop as layers and played around with the blending. For the next hour I played around creating different versions using transformations, blending, masking, inverting, stroking etc. The Triptych here is version 18 (Left) version 11 (middle) and version 23 (Right).
I have not played like this for sometime, creating abstract images. Good fun
Please Note:-
"No Pixels were harmed in the production of these images"
The Original Image and its two Lightroom creations
 |
| Initial image with Lightroom adjustments |
 |
| Virtual Copy #1 |
 |
| Virtual Copy #2 |
Into Photoshop - A start
I almost always look to create a square image so I would either resize the image to a square or crop to a square. As the final image is unlikely to be 'real' then resizing the image in photoshop with its distortions is not a problem.
I hid the top layer of the three and then changed the blending mode of the second layer. Along with a transformation and rotate 180 degrees.
The top layer is then made visible and the process repeated.


With the last three images here I selected the canvas and modify / contract by 500 pixels to create a border area. I invert this selection and create a curves layer to change the look of the outer area. I also stroked this area on a separate layer in 'red'
Brain in 'Free Fall'
At this point I was quite happy with some of the versions. I created Stamp Layers where I was happy with a result. I felt I could add symmetry and give a different look by using masking the individual stamp layers to show different versions in the corners.


Rotation


No comments:
Post a Comment